

 +86 15814116500
 Views: 0 Author: Site Editor Publish Time: 2026-08-25 Origin: Site



A conveyor belt metal detector works by using electromagnetic induction. Inside the unit, a balanced three-coil system creates a high-frequency magnetic field. Two receiver coils are set in perfect opposition, which creates a null balance condition. When metal contamination passes through the aperture, it disrupts this field. That disruption triggers immediate detection.
Picture a food plant running thousands of packaged meals each hour. One stray bolt from upstream equipment could ruin an entire batch. This product inspection equipment catches that threat instantly, protecting both consumers and your brand reputation.
You need a system that can reliably detect metal contaminants at production speeds. Understanding the detection principle, contaminant types, and selection criteria helps you choose wisely. This guide covers those essentials, plus calibration and integration tips for food safety compliance.
Table of Contents
Metal detectors use electromagnetic induction to find metal inside products.
Iron metals are simple to detect; stainless steel is the toughest.
Pick the smallest opening that your product can fit through for the best detection.
Calibrate the metal detector every day, and test it using pieces made of ferrous, non-ferrous, and stainless steel.
Put the detector far from motors and use non-metallic belts to avoid false rejects.
Choose a reject method that fits your product type and how fast your line runs.
Good grounding and installation help make sure detection works reliably and follows the rules.
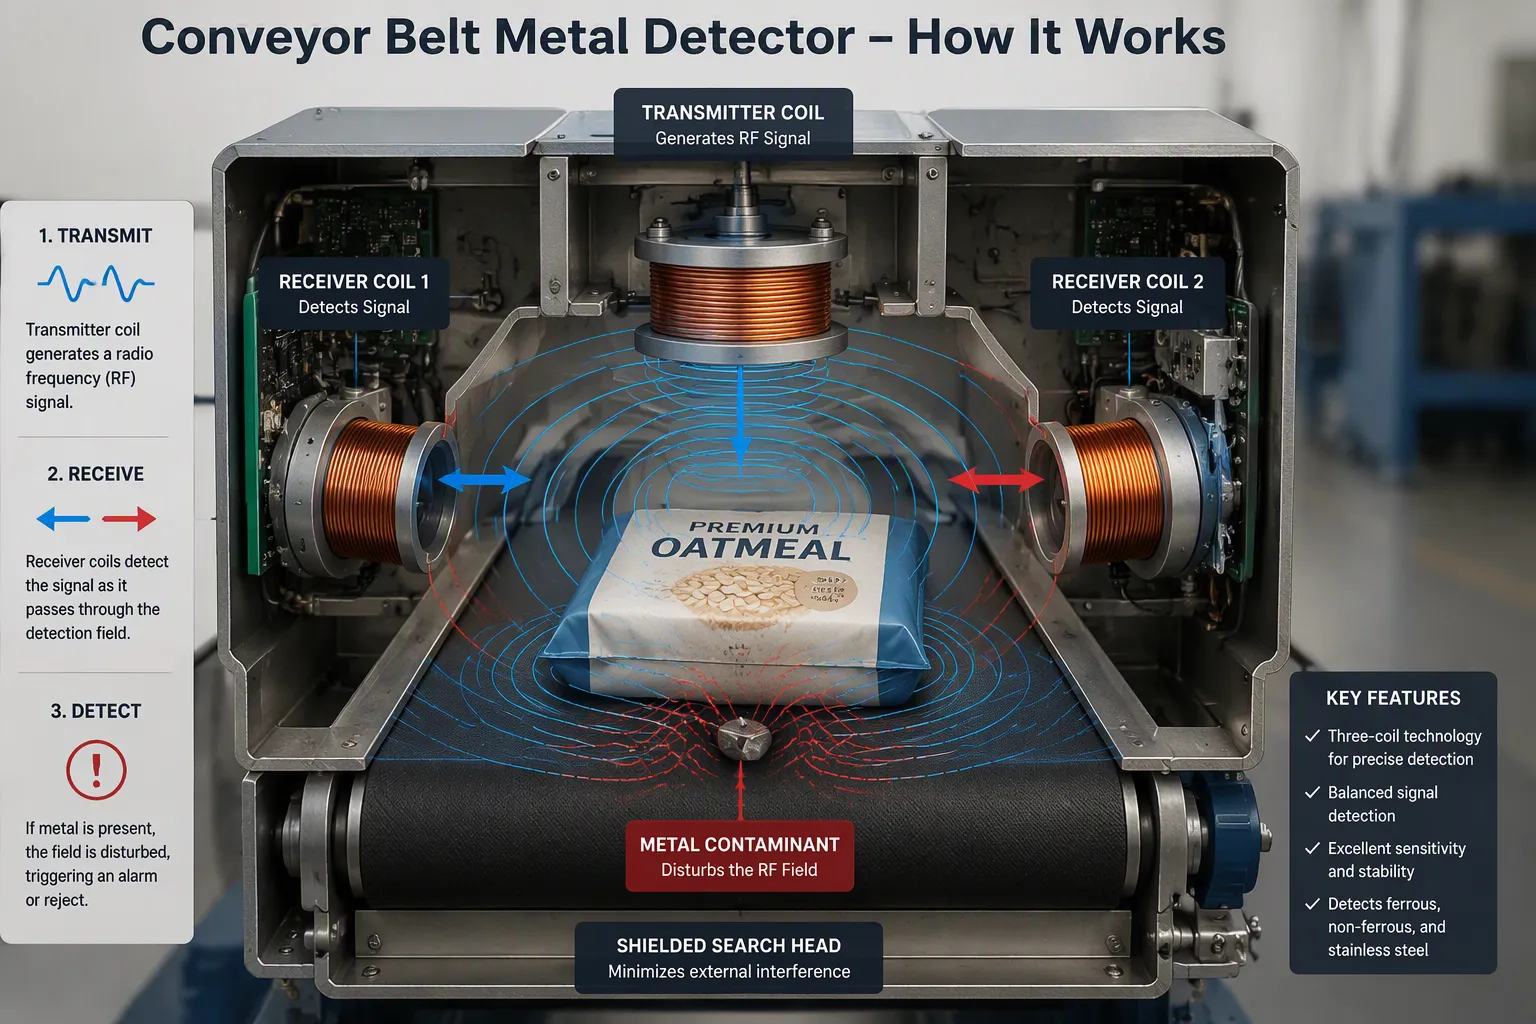
Knowing how a conveyor belt metal detector works helps you see what it can and cannot do. The whole system depends on one basic physics idea: electromagnetic induction. Every detection event can be traced back to this principle.
The search head is the core of any conveyor belt metal detector. Inside this shielded unit, you will find three carefully wound coils arranged around an opening. Products pass through this opening during production.
A central transmitter coil sends out a radio frequency signal. This signal creates an electromagnetic field that fills the opening. Two receiver coils sit at equal distances on either side of the transmitter. Their signals connect in opposite directions to each other.
In a clean state, the two receiver coils produce equal but opposite signals. These opposing signals cancel each other out completely. Engineers call this the null balance condition. The system stays quiet when no metal passes through.
Metal detectors work by looking for changes in the magnetic field when a product passes through the metal detector head.
Any disruption to this balanced state signals possible contamination. The control electronics constantly watch the receiver coils for any change from null balance.
When metal enters the opening, it interacts with the electromagnetic field. The interaction depends on the metal's properties. Ferromagnetic materials like iron absorb and concentrate magnetic field lines. This action creates a local disturbance in the field's uniformity.
Non-ferrous metals act differently. They do not concentrate field lines. Instead, they create their own opposing fields through eddy currents. The detection sequence follows a specific pattern:
A coil in the detector produces a rapidly alternating magnetic field.
When this field reaches a metal object, it creates eddy currents within the metal.
These eddy currents generate their own secondary magnetic field.
A receiver coil in the detector picks up this secondary field, showing the presence of metal.
The disturbance shows up in two measurable ways. First, the amplitude of the received signal changes. Second, the phase relationship between sent and received signals shifts. Different metals produce distinct phase and amplitude signatures.
Ferrous metals usually cause large amplitude changes with minimal phase shift. Non-ferrous metals produce smaller amplitude changes but significant phase shifts. Stainless steel falls in between, depending on its magnetic grade. The detector analyzes both parameters to identify the contaminant.
Raw signals from the receiver coils contain noise and interference. The control unit filters this noise before analysis. Advanced digital signal processing isolates the product effect to reduce its impact on detection. This filtering is essential when you run products with natural conductivity variations.
Modern systems use dual-frequency technology. This approach improves simultaneous detection of both ferrous and non-ferrous metals. The detection head also resists external magnetic field disturbances from floor vibration and nearby inverters. You keep high sensitivity without losing repeatability.
The detection threshold is a preset value. When contamination exceeds this value, the detector triggers an alarm or rejection system. You set this threshold through an intelligent sensitivity adjustment feature. The system allows digital setting based on product characteristics and belt speed.
Thresholds are set by finding the best possible sensitivity for each specific product, considering product size, type, and packaging.
This calibration must be done with the metal detector manufacturer.
Sensitivity adjustment controls must be limited to named, fully-trained staff, with password protection or locks for extra security.
Sensitivity should be maximized while guarding against instability that could cause false rejects from product or environmental effects.
The FOCUS function provides enhanced detection of hard-to-find contaminants such as wires, shavings, and flakes. This feature is useful when you process products with challenging conductivity profiles.
An improved auto-learn process optimizes phase, frequency, and detection algorithms for dual simultaneous frequencies. This ensures reliable and repeatable performance across different product runs. You can switch between products quickly without extensive manual recalibration.
The entire signal processing chain works together smoothly. Filtering removes noise, amplification boosts weak signals, and threshold comparison makes the final decision. This integrated approach ensures your conveyor belt metal detector catches contaminants reliably while minimizing false rejects that disrupt production flow.
When you check metal contamination risks in your production line, you need to know which metals are most dangerous. The three main types are ferrous metals, non-ferrous metals, and stainless steel. Knowing these types helps you set up your detector correctly. The types of contaminants you find change your system's sensitivity needs. Each type acts differently inside the detection field. Your metal detector must handle all three to keep your products safe.
Ferrous metals contain iron. They have very low electrical conductivity and are very magnetic. These two properties decide how the object creates a magnetic field when it meets the detector's electromagnetic field. The strong magnetic response from these properties is why ferrous metals like iron and steel are easier to find. Your detector finds these objects easily. Common sources are broken machine parts, bolts, and washers.
Ferrous metals: These detectors easily pick up iron and steel objects.
Detecting ferrous metals needs less sensitivity from your equipment. These materials cause a big signal change in the receiver coils. You can set your detection threshold higher and still catch small particles. Many factories use this benefit to keep high production speeds. Ferrous metals are still the easiest type to detect in any conveyor belt system.
Non-ferrous metals have no iron. They are not magnetic. Their detection depends on electrical conductivity. Metals with high conductivity like aluminum, copper, and brass create strong eddy currents when they pass through the detector's electromagnetic field. These eddy currents make a clear signal that makes detection easy, as long as the object is solid. Detection sensitivity for these metals is about 1.1 times that of ferrous metals.
The presence of heavy metals in food, such as lead, cadmium, mercury and arsenic, presents severe health risks including neurological damage, organ failure and cancer. The table below shows the health risks and common sources of these toxic metals.
Metal | Health Risk | Common Source |
|---|---|---|
Mercury | Neurological damage | Larger fish |
Arsenic | Cancer, cardiovascular disease | Rice, drinking water |
Lead | Developmental delays, kidney damage | Spices, contaminated water |
Cadmium | Kidney disease, bone damage | Leafy greens, cocoa |
Conductivity is a key factor in how the metal detector's coils are disturbed. Non-ferrous metals are less conductive than ferrous metals, so they need larger particles to be detected. Lower conductivity makes detection harder. Your detector must use higher sensitivity settings for materials like lead. The control unit looks at phase and amplitude to tell apart different non-ferrous metals.
Stainless steel comes in many types. Magnetic types like 430 have more iron and are easier to detect. Non-magnetic types like 302, 304, and 316 are very hard to find. These types have low magnetic permeability and poor electrical conductivity. They make weaker signals than ferrous metals. Your detector needs advanced processing to find these materials reliably.
The trouble with detecting stainless steel comes from its low electrical conductivity and magnetic permeability. The orientation effect makes detection even harder. Stainless steel wires are hardest to find when they are placed sideways to the direction of travel. Ferrous wires do not have this same orientation problem. The size and shape of the object also matter. Small or thin items may be missed completely. You can fix this problem by using high-frequency detectors, raising sensitivity settings, and using good scanning methods. Multi-zone analysis and better signal processing help overcome these physical limits. No single detector setting can fully make up for the weak signal of stainless steel.
Finding metal is only part of the job. You also need a good way to take out the bad product from your line. The best method depends on how heavy, shaped, and fast your product is. Different systems work better for different products. Knowing each option helps you pick the right one for your work. Many makers build these reject systems right into their metal detectors with conveyors for smooth operation.
The air blast reject system uses a fast, short burst of air to push light products off the belt without stopping the line. When the detector finds a bad item, a nozzle fires a quick burst of air that pushes the product into a reject bin. The control valve turns on in just a few milliseconds. This speed keeps your line moving while packages are removed.
The system has an air hose that forces air through a nozzle at high pressure. The air jet blows away products that fail quality checks. The bad items go straight into the reject container. This method does not touch your product, so no moving parts come into contact with it.
Air blast systems work best for packaged products up to 5 lbs. They also work well for belts that are 12 inches or narrower. The air stream cannot move heavier items or big packages. For those, you need a different method.
This method works well for small bags, pouches, and light cartons. The blast does not hurt the packaging. It also leaves no marks or residue on the product surface. Many food makers choose this option for snack foods, baked goods, and candy.
The retracting belt reject removes bad product by pulling back the end of the belt for a short time. This opens a gap for the product to fall into a reject bin. The nose bar slides back horizontally to open the gap. The bad product drops off the edge while good product keeps moving forward.
Two air cylinders allow quick cycling. This design removes bad product while wasting less. The system handles packaged and unpackaged items, single products, and bulk flow. Food processing plants use this method a lot.
Retracting belt systems are great for raw bulk products like trim beef, pork, lamb, and chicken. The drop uses gravity to handle any weight. You do not need to push heavy items sideways. The product simply falls through the gap.
Hygienic operation is important in food plants. This design can handle frequent cleaning cycles. The open hinge design makes cleaning easy between runs. For sticky products and raw dough, this method has no risk of smearing or leaving residue on the belt. That makes it very clean for tough materials.
Push-off systems use an air or motor cylinder to push a pad across the belt. The pad pushes the bad product sideways into a reject chute. Response time is between 50 and 150 milliseconds. This speed works for products weighing between 50 grams and 25 kilograms.
The contact pad width must match your product size. Tall products may need a two-level pusher to stop them from tipping. The arm must pull back fully before the next good product arrives. This pull-back time can limit how fast the line can run.
Flap gates and diverter arms offer another way to remove product. A gate flips to redirect the product to a reject bin. A diverter arm swings across to guide the product off the main path. These mechanisms work well for products that come in neat rows.
Drop-out systems work differently. A belt section drops away, retracts, or speeds up to open a gap. The product falls straight down into a bin. This method needs a gap of at least 300 to 500 mm between products. It cannot cycle fast enough for high-speed lines with tight spacing.
The table below compares push-off and drop-out systems:
Feature | Push-Off (Pusher Arm) | Drop-Out (Retractable Belt) |
|---|---|---|
Operating Principle | Air cylinder pushes pad across belt | Belt section drops away to open gap |
Response Time | 50–150 ms | 150–500 ms |
Product Weight Range | 50 g – 25 kg | Any weight (gravity helps) |
Product Contact | Side contact (pad touches product) | None (gravity does the work) |
Key Design Consideration | Contact pad width must match product | Drop-out section must clear entire product |
Primary Limitation | Retract time limits throughput | Needs 300–500 mm gap between products |
Your choice of reject method directly affects how well your line runs. Think about your product's features carefully when picking a reject option. Talk with your metal detector maker to match the right reject system to your job. The best metal detectors with conveyors offer flexible options for connecting.
Choosing the right system takes careful thought. You cannot just pick the most sensitive unit on the market. Several factors decide what works best for your line. Knowing these factors helps you avoid costly mistakes. Let's look at the key questions to consider when buying a metal detector for your facility.
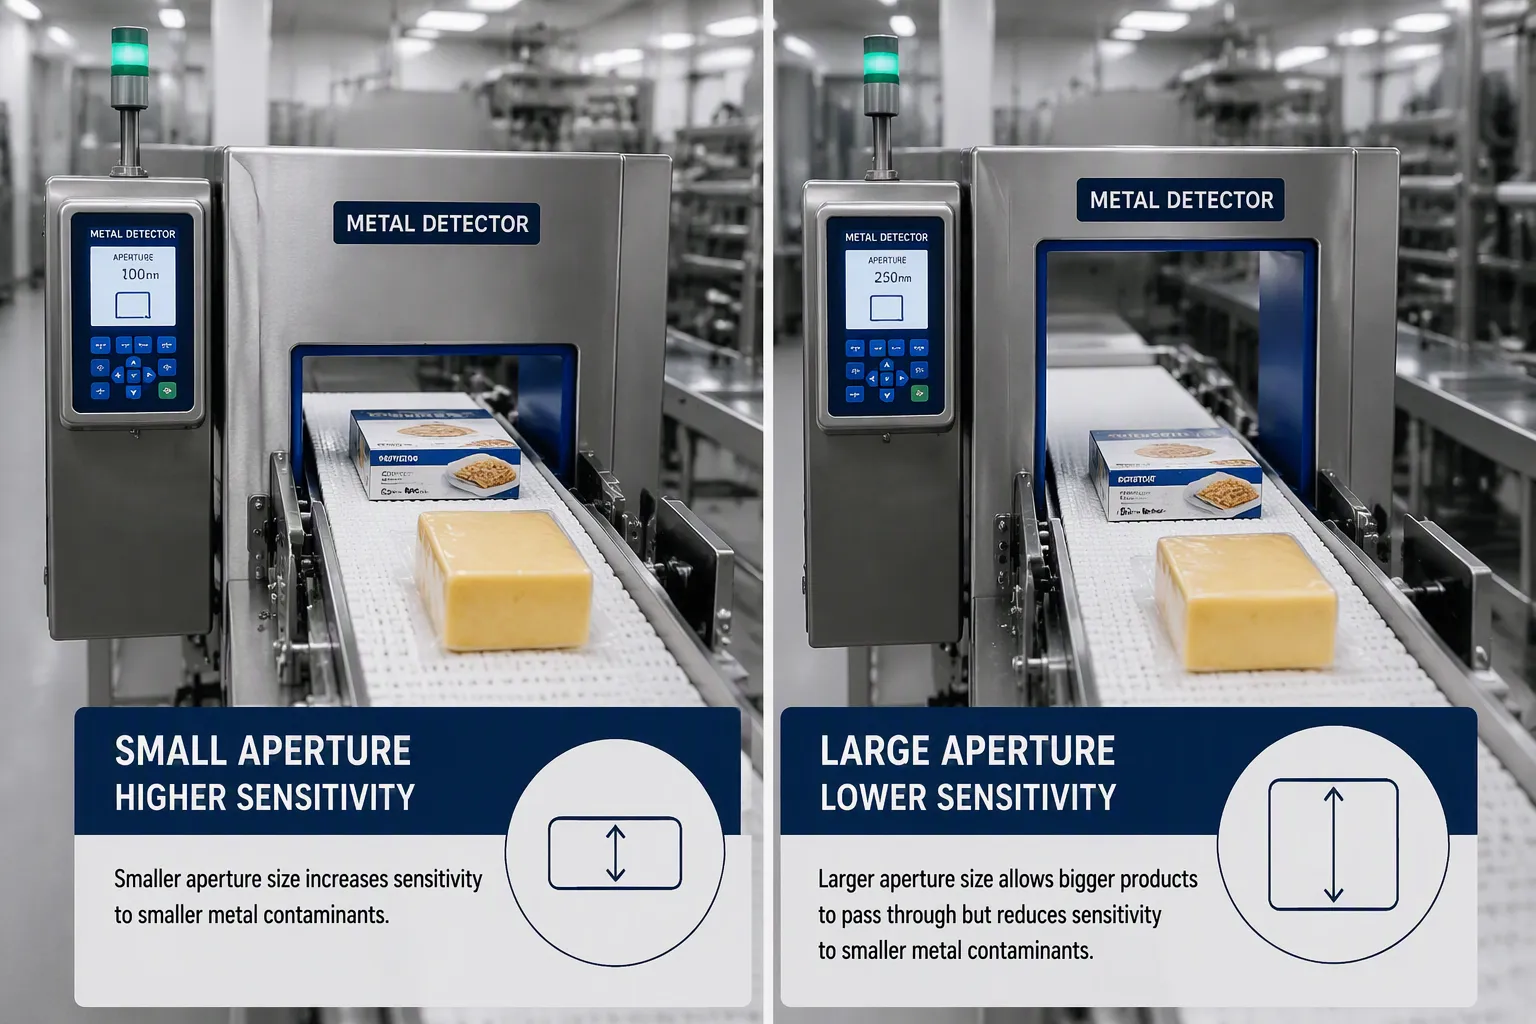
The aperture is the opening where your products pass through. Its size directly controls what you can detect. You must match the aperture to your conveyor width and product height. A larger opening lets bigger products pass through. But that larger opening comes with a trade-off.
The size of the aperture (the metal detector opening) affects the achievable sensitivity more than the size of the product. A 50mm high block of cheese can go through a 100mm high opening (possible result 2.5mm S/S detected), or through a 350mm high opening (possible result 6.5mm S/S detected). The difference in the opening size will affect the achievable result and as you can see from the figures the difference is significant.
This rule holds true for all applications. You want the smallest aperture that comfortably fits your product. That choice maximizes your detection ability. Measure your tallest product and widest package before you start shopping.
Product effect is how well a product conducts electricity and creates its own magnetic field. Products with high moisture, salt, or metalized packaging can act like a metal contaminant. This interference causes false readings and makes calibration harder.
During calibration, the detector learns the natural properties of your clean product. It sets a baseline that ignores that signal. This process removes the product effect from testing. If your product changes, you must re-calibrate. Things like moisture content, salt content, temperature, size, shape, and packaging materials all raise the product effect.
The table below shows how aperture size affects achievable sensitivity for different metal types:
Aperture Size | Ferrous (mm) | Non-ferrous (mm) | Stainless (mm) |
|---|---|---|---|
Small (60×60 mm) | 0.8–1.5 | 1.2–2.5 | 1.5–3.0 |
Medium (200×100 mm) | 1.5–2.5 | 2.5–4.0 | 3.5–5.0 |
Large (400×300 mm) | 2.5–4.0 | 4.0–6.0 | 5.0–8.0 |
Sensitivity means the smallest metal piece your system can reliably find. You must decide your required detection sensitivity based on the smallest contaminants that could get into your product. Different metals need different sensitivity levels. Ferrous metals are easiest to find. Stainless steel is the hardest. Your sensitivity setting must handle the worst-case situation.
The link between conveyor speed and detection reliability is direct and clear. Higher belt speeds shorten the time a product stays within the detector's sensing field. This shorter window reduces the available detection time. The system struggles to find small or low-density metal pieces. Not enough exposure time lowers sensitivity and raises the risk of missed contaminants.
Fast belt movement also creates mechanical vibration. This vibration disrupts the detector's signal. Accuracy drops as a result. To keep reliable inspection, you must match conveyor speed with the detector's ability. Running the belt faster than the detector can handle leads to poor performance. You get both missed contaminants and false rejects.
Your facility's environment plays a big role in your choice. Wet environments need equipment with an IP69K rating. This rating handles high-pressure washdowns. Temperature extremes affect electronics and coil stability. Vibration from nearby machinery can disrupt calibration. You need strong materials built for harsh conditions.
Feature | Importance |
|---|---|
Reduces false positives from wet, salty, or conductive products | |
Auto-reject mechanism | Physically removes contaminated product without stopping the line |
IP69K rating | Withstands high-pressure washdowns in wet environments |
Data logging & connectivity | Tracks reject events for audit trails and compliance |
Food safety standards shape your equipment choices. HACCP and GFSI frameworks require documented inspection procedures. Your metal detector must support audit trails. Data logging and connectivity features track reject events for compliance. International standards like ISO 9001 and CE certification show quality manufacturing. Ask your supplier about these certifications before you commit.
Other practical questions to consider when buying a metal detector include conveyor frame reinforcement. Metal detectors are heavy. Vibration can affect calibration. Measure belt to overhead structures. Add detector frame height and reject mechanism space. Ensure your reject bin has enough capacity to avoid overflow. Integration sequence matters too: stop signal wiring, reject mechanism sync, upstream sensor tie-in, and data output connection.
Coso offers customizable solutions across industries. Their modular designs adapt to your specific line. You can integrate their systems with existing conveyors easily. Their self-learning calibration features simplify product changeovers. When you evaluate your options, keep these factors in mind. The right conveyor belt metal detector protects your brand and your customers.
Calibration keeps your conveyor belt metal detector accurate and reliable. Without it, you might miss contaminants or reject good product. Calibration is very important. A well-calibrated system protects your brand and your customers. A poorly calibrated one causes costly problems. You need a clear plan to get steady results.
You start with calibrated test pieces. These spheres and rods come in ferrous, non-ferrous, and stainless steel types. Each piece has a known size and makeup. You pass these standards through the detector to check its response. The smallest piece you need to find comes from your risk assessment. That piece becomes your baseline standard.
Your process follows a clear order. First, let the detector warm up for 15 to 30 minutes. This steadies the electronics. Reduce electrical noise from variable frequency drives or wireless devices nearby. Then set baseline conditions. Calibrate at your normal production conveyor speed. Use product samples that show changes in moisture, fat, size, and packaging.
Calibration matters, and your testing schedule shows it. Do daily sensitivity checks at shift start. Run full calibration monthly or when you change products. Check right after maintenance or electrical changes. For BRC standards, test at start-up and end of shifts, product changeovers, and after machine setting changes. Many sites test at least hourly during production. Your manufacturer guidelines may require more checks.
Document every calibration event. Record the date, time, settings, and test results. This documentation supports your HACCP and GFSI compliance audits. Limit sensitivity controls to trained employees only. Use password protection or locks to stop unauthorized changes.
You test multiple metal types for a good reason. Ferrous metals are easiest to find. Non-ferrous metals come next. Stainless steel is hardest because it is not magnetic. Common standards define targets like 3 mm ferrous and 4 mm stainless steel. Testing both ensures you cover the easiest and hardest real contaminants on your line.
Stainless steel is often listed as a possible contaminant in HACCP plans because it is used in production equipment (scrapers, knives). Because it is not magnetic, it is hard to find, which is why auditors specifically require it in routine testing protocols.
Place test pieces at worst-case spots. Test at the far edge, center, and low or high positions on the belt. Try multiple angles for each metal type. Run the actual product at full line speed with typical fill and packaging. Record the smallest reliably found piece for each metal type. Raise sensitivity step by step until the smallest acceptable test piece passes consistently. Aim for detection in 3 of 3 or 10 of 10 trials.
Product effect causes many false rejects. Wet, salty, or conductive products create signals that look like metal. Your detector learns these natural properties during calibration. It sets a baseline that ignores the product signal. If your product changes, you must re-calibrate. Moisture content, salt content, temperature, size, shape, and packaging materials all affect the product signal.
Install the detector away from sources of interference. Nearby motors, inverters, and wireless devices can trigger false rejects. Mechanical vibration from the conveyor also disrupts the signal. Use isolation mounts to reduce vibration transfer. Check grounding regularly. When a false reject happens, find the root cause. Check sensitivity settings, grounding, conveyor condition, and product changes. Recalibrate and re-run validation before restarting production.
How well your metal detectors with conveyors work depends on proper installation and setup. A unit placed in the right spot catches contaminants reliably. A unit placed poorly causes false rejects and missed threats. You need a clear plan before you bolt anything down.
Start with a full site survey. Map every piece of equipment near your planned location. Find electromagnetic interference sources before you pick a spot. Large metal masses, variable frequency drives, and motors all disrupt detection. You need at least 150 mm of clearance from these items. Mount the detector housing 12 inches away from conveyor frame supports. Your metal detectors with conveyors need this clearance to keep stable readings.
Place the detector after contaminating processes but before packaging. This installation position catches threats at the last practical moment. For aluminum foil products, position the unit before the foil wrapping stage. Foil creates a strong signal that looks like metal contamination. Plan your integration with upstream and downstream equipment during this stage.
Your belt material matters more than most buyers realize. Use non-metallic belts whenever possible. Metal fasteners and splices near the aperture create false signals. These false signals force you to lower sensitivity settings. Lower sensitivity means smaller contaminants escape detection.
Keep product presentation steady and centered on the belt. Products that shift sideways or tumble create inconsistent signals. This inconsistency complicates calibration and reduces detection sensitivity and reliability. Check belt tension regularly. A loose belt flaps and vibrates, disrupting the magnetic field.
Grounding deserves your full attention. Poor grounding causes more false alarms than any other factor. The conveyor frame must connect to earth ground with resistance below 25 ohms. Verify this reading with an earth ground ohmmeter.
Run the detector's power wiring in a dedicated conduit. Use a separate circuit from the main power bus. This circuit must stay free of inductive loads like motors and solenoids. If you cannot find a clean circuit, use a constant-voltage transformer with harmonic neutralization. Mount this transformer within 3 to 5 feet of the detector.
Requirement | Specification |
|---|---|
Ground Resistance | Less than 25 ohms to earth ground |
Grounding Configuration | Single-point grounding through power supply only |
Static Voltage Limit | Below 500V on belt surface during operation |
Motor Brush Assembly | Dedicated ground wire, minimum 14 AWG stranded copper |
Modern detectors offer multiple integration options. Discrete 24VDC outputs carry Pass, Reject, and Fault signals to your PLC. Serial communication via RS-232 or RS-485 Modbus RTU suits older systems. Ethernet options like Ethernet/IP and Profinet connect to modern control networks.
Choose your reject method based on product type and line speed. Use a pusher for rigid packages. Select airblast for flexible pouches. Drop-through units work for vertical drops. Arm or paddle mechanisms handle small items. Your reject device must sync with the detector's output timing. The detector provides a healthy signal and a metal detection signal to the PLC. The PLC controls the conveyor interlock based on these inputs.
Train your operators on daily inspection routines and proper setup procedures. They must check the earthing system each shift. They must inspect all cables for damage or loose connections. Clean the aperture regularly to remove product buildup. Buildup on the aperture walls mimics metal signals.
Check belt tension and tracking daily. A misaligned belt rubs against the detector housing. This friction creates vibration and false triggers. Review alarm logs at the end of each shift. Patterns in false rejects point to developing problems.
When false rejects occur, work through a systematic checklist. Check grounding connections first. Inspect cable routing for proximity to power cables. Verify calibration settings match the current product. Look for intermittent EMI sources like nearby welding operations.
Document every maintenance action and test result. This documentation supports your HACCP and GFSI compliance audits. It also helps you spot recurring issues before they cause production downtime. Coso's support team assists with seamless installation, integration, and troubleshooting. Their modular designs simplify maintenance and reduce spare parts inventory.
You now understand how a conveyor belt metal detector works. It uses electromagnetic induction to catch contaminants. You also know the three main metal types you must detect. When buying a metal detector, consider aperture size, sensitivity, and your environment. Proper calibration and validation prevent false rejects. Correct installation ensures compliance with safety standards. You must integrate the right reject mechanism for your product. The reject system must sync with the conveyor speed. A well-chosen reject method reduces waste. Apply this guide to your facility. Consider consulting Coso for customized solutions. Their team helps you select the right inspection equipment. Visit their website at https://www.metaldetectorfactory.com/ for more information or to request a quote.
You should check sensitivity at the start of every shift. For BRC standards, test at start-up, end of shifts, product changeovers, and after machine setting changes. Many sites test at least once every hour during production. Your manufacturer guidelines may require more frequent checks.
Product effect means your product's natural conductivity creates a signal that looks like metal. Wet, salty, or conductive products cause this interference. During calibration, the detector learns your clean product's baseline. If your product changes moisture, salt, temperature, or packaging, you must recalibrate.
Stainless steel has low magnetic permeability and poor electrical conductivity. Non-magnetic grades like 304 and 316 produce weak signals. The orientation effect makes detection harder too. Thin stainless steel wires placed sideways to travel direction are hardest to find. You need advanced signal processing to catch them reliably.
Yes, you can integrate a metal detector with your current conveyor. You must ensure proper clearance from metal masses and electromagnetic interference sources. Use non-metallic belts whenever possible. Metal fasteners and splices near the aperture create false signals. Check belt tension regularly to prevent vibration.
False rejects come from product effect, vibration, electrical noise, and poor grounding. Install the detector away from motors and inverters. Use isolation mounts to reduce vibration transfer. Check grounding connections first when false rejects occur. Verify calibration settings match your current product.
Higher belt speeds shorten the time products stay in the sensing field. This reduces detection reliability for small metal pieces. Fast belts also create mechanical vibration that disrupts the signal. You must match conveyor speed with your detector's capability. Running faster than the detector handles causes missed contaminants and false rejects.
Use calibrated spheres in ferrous, non-ferrous, and stainless steel types. Common standards define targets like 3 mm ferrous and 4 mm stainless steel. Place test pieces at worst-case positions: far edge, center, and low or high on the belt. Run actual product at full line speed during testing.
Yes, wet environments require equipment with an IP69K rating. This rating handles high-pressure washdowns. Temperature extremes and vibration also affect electronics and coil stability. Choose strong materials built for harsh conditions. Ask your supplier about ISO 9001 and CE certifications before purchasing.

